長澤ただし (Processing Report.4)
2016/01/09
cm精度の距離であればものさしではかるのが簡便であり、普通である。
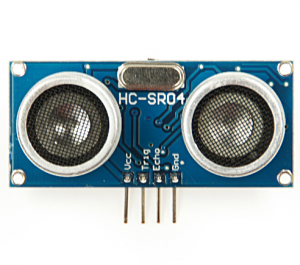
しかし、時には「手元にものさしがない代わりにArduinoとPCとHC-SR04がある」という状況に遭遇することもあるかもしれない。
HC-SR04が各地で安価に手に入るようになっているので、距離を測定してPC画面に表示する備忘録。

したがって正しいタイトルは
HC-SR04とArduinoとprocesingで距離測定
Arduino→processingに送ってWindows上で表示(演示)することを想定
基本的な発想はこのエントリ 亀田○毅のArduino→Processing
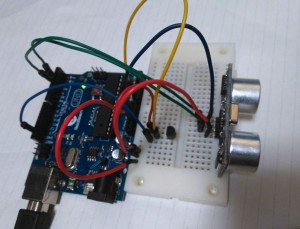
Trig-Pin2
Echo-Pin3 へ
また、意味があるかはともかくとして、温度校正用にLM35をAnalog_0へ

正規版のArduino UNOではなく、色が濃いほうを使ったのは、ささやかな節約です。
Arduino側【先人の例の引用・修正】
int Duration = 0; //受信した間隔
int Distance = 0; //距離
void setup() {
Serial.begin( 9600 );
pinMode( 2, OUTPUT );
pinMode( 3, INPUT );
}
void loop() {
int ans , temp , tv ; //温度計測用の変数
ans = analogRead(0) ; //アナログ0番ピンからセンサ値を読込む
temp = ans * 500 / 1024;
digitalWrite( 2, HIGH ); //超音波を出力
delayMicroseconds( 10 );
digitalWrite( 2, LOW );
Duration = pulseIn( 3, HIGH,10000 );
if (Duration > 0) {
Distance = Duration/2;
float sspeed = 331.5+0.6*temp;
Distance = Distance*sspeed*100/1000000;
Serial.write(Distance);
}
delay(100);
}
ダウンロード:dis2.ino
processing側
import processing.serial.*;
Serial myPort;
int y;
int portIndex = 3;
int dis = 0;
void setup(){
  size(800,230);
   if(portIndex==-1){
    for(int i=0, l=Serial.list().length ; i < l; i++){
      println(i+" : "+Serial.list()[i]);
    }
    exit();
  }else{
   myPort = new Serial(this, Serial.list()[portIndex], 9600);
}
}
void draw(){
  background(0,0,0);
  fill(10,10,10);
  rect(310, 60, 600, 65);
  fill(255,255,80);
  textSize(80);
  textAlign(RIGHT);
  text(y, 180, 123);
  textSize(50);
  textAlign(LEFT);
  text("cm", 185, 123);
  rect(310, 60, y*3, 65);
  textAlign(CENTER);
  textSize(20);
  text(0, 310, 150);
  text(50, 460, 150);
  text(100, 610, 150);
  text(150, 760, 150);
  delay(100);
}
void serialEvent(Serial p){
  y = myPort.read();
}
ダウンロード:dis2.pde
はじめに int portIndex = -1; としてポートを確認し、設定する。
稼働画面
その道の方へのおまけ
この工作をしたのは、冒頭のものさしの常識に挑戦するため…ではなく、超音波距離計で開管を測定することで「開口部で音波が反射すること」を演示できるとのうわさを聞いた故です。
その様子
左側115cmあまりのところに障害物(いす)をおいています。
管の長さが11cmに対して13cmの表示は誤差では片付かない感じがします。

